GuidedGradCam on EfficientNet

I’ve been working with the EfficientNet architecture lately and I wanted to apply Captum’s GuidedGradCam on it but I am getting strange results:

This is the code that I’m using:

from models.efficientnet import EfficientNet
import torch
import PIL.Image
from matplotlib import pyplot as plt

from torchvision.transforms import ToTensor, Resize, Compose, ToPILImage

from dataset_fun import get_data

device = 'cpu' ## Let's just put this to CPU for simplicity
model = EfficientNet.from_pretrained('efficientnet-b2', num_classes=2)
model.load_state_dict(torch.load(
    '$PATH_TO_MODEL/pre_trained_model.pt'))

df = get_data() # Getting my data
df = df[df['label'] == 1]

transforms = Compose([Resize((224, 224)), ToTensor()])

model = model.to(device)
model.eval()

# Here I Instantiate the grad cam class as well as the desired layer to compute the gradients
grad_cam_layer = model._conv_head # Last convolutional layer of the EfficientNet
guided_fc = attr.GuidedGradCam(model, grad_cam_layer)
for filename in df['filename'].values.tolist():
        # Some due pre-processing
        im = PIL.Image.open(filename)
        im = im.convert('RGB')
        im = transforms(im).unsqueeze(0).to(device)
        
        # Obtain attributes
        attributes = guided_gc.attribute(im, 1)

        # Plot them on screen
        plt.imshow(ToPILImage()(attributes[0])) # We convert to PIL and show it on screen
        plt.show()
        plt.clf()  # will make the plot window empty

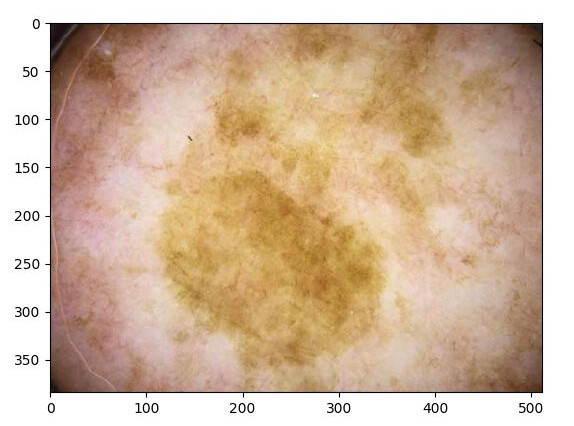
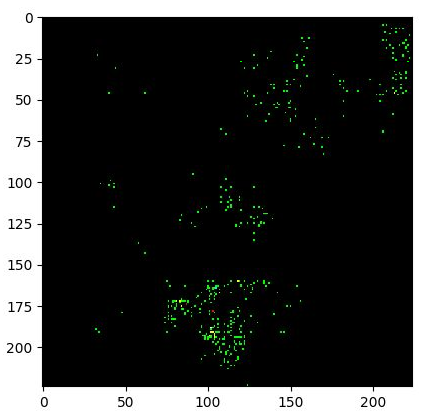
Below I show the photo that was sent to the model and the returned GradCam (I know the photos aren’t pretty, skin cancer isn’t beautiful). As it can be seen, the result doesn’t provide much information.

Dissecting the EfficientNet I’ve seen that it doesn’t use any nn.ReLU but rather a novel non-linear function named Swish. Could this be causing the error as in the Captum implementation they mention that the ReLUs have to be of a specific type.

Any help on how to properly compute the Guided Gradient Cam of an image using Captum would be appreciated.

Caveat: I know the first image is bigger, but it gets resized in the transform.

2021-02-05-130057_574x426_scrot 2021-02-05-130206_441x417_scrot

Advances:
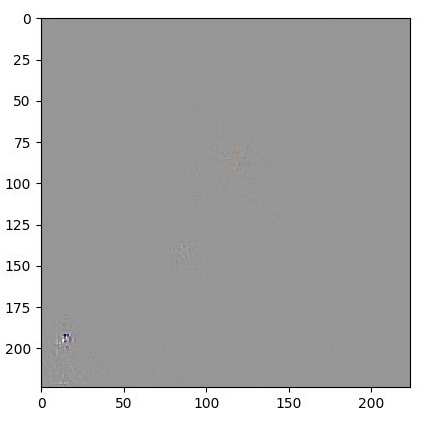
I managed to change the Swish to a nn.ReLU() with the following code:

for i in range(len(model._blocks)):
      model._blocks[i]._swish = nn.ReLU()
model._swish = nn.ReLU()

The problem is that it now outputs a complete black square.
Althought this is the recommended activation function, the model wasn’t trained with it.

Updates:
I retrained the model with nn.ReLU() instead of custom swish functions. The result is very similar.

Taking a look at this other post in the pytorch forum one can see that their result for GuidedGradCam is more informative.

As it can be seen in my code, the in which I plot the image is via first converting it to a PIL image. Has anyone used Captum’s GuidedGradCam on a CNN that might be able to shed some light into why I’m having this output?

I’m not familiar with the underlying method in Captum, but based on your output image you might be running into clipping artifacts.
I assume this line of code converts the wanted output to the PIL.image?

ToPILImage()(attributes[0])

If so, could you check the stats of attributes[0] before converting it (min, max, mean, dtype etc.)?

Hello @ptrblck, thx for your answer:

Some info:
attributes.shape [1,3,224,224] (that’s why I take the [0])
dtype: torch.float32
min: -0.3880
max: 0.2677
mean: -3.287e-05 (isn’t it weird that it’s lower than the minimum?

It does seem that the values aren’t proper for an image visualization. Is it a preferred way to convert from tensor to image that does this under the hood?

Thanks for the information.

The mean is not lower than the min (note the e-05), as it’s close to zero.

Based on the tensor stats I think you should normalize the tensor to have values in [0, 1], as otherwise you’ll lose information.
ToPILImage would call these lines of code:

        if pic.is_floating_point() and mode != 'F':
            pic = pic.mul(255).byte()

which will add the clipping.
Use:

x = torch.randn(3, 224, 224)
x = x - x.min()
x = x / x.max()

to squash the values into [0, 1] before plotting them. You would still lose some information, but it might not be that disastrous.

Your snippet did the trick. Thank you for your time.

Cool! Out of curiosity: could you post the new output image?

The results are not very informative:

2021-02-08-123313_430x425_scrot

But it does look like the classical GuidedGradCam as seen here.

My next step now is to get the Grad Cam (similar thing but with a heatmap instead of a grayish image) which funnily enough that’s what I wanted on the first place.