So when we save the model and if we decided to tweak the hidden layers, we can just adjust the hidden layers while using the weights from model.state_dict() ? ( the bunch of codes towards the end )
The model parameters should match the stored parameters in the state_dict. Otherwise you’ll get a size mismatch error. You could store the original shapes in the checkpoint, if you think it’s convenient.
You could adapt the code to your use case, but note that the code hasn’t been updated in a while and still uses Variables, which were deprecated in PyTorch 0.4.
def load_checkpoint(filepath):
    checkpoint = torch.load(filepath)
    model = fc_model.Network(checkpoint['input_size'],
                             checkpoint['output_size'],
                             checkpoint['hidden_layers'])
    model.load_state_dict(checkpoint['state_dict'])

    return model
Thank you for the reply.
So basically , we can re-use the weights but we need to change the architecture based on this function
What’s the difference if we re-train again when we define the network? In what way we’re re-using checkpoint['state_dict'] and how it differs with transfer learning?
side track,
I’ve been going from coursera deeplearning.ai , fast.ai and now udacity’s pytorch. It seems like I prefer pytorch ( or fast.ai ) and I love the community here.
My question is how do I get used to the syntax
( i.e turn off gradient and dropout during inferencing ).
Thank you for the reply.
What I’m trying to say is there is a lot of steps that are consistent I think, so how does one remember these steps OR usually we do not need to remember ( just keep it in your notepad) and understand what it is trying to do. Because DL is definitely not as straight forward as sklearn’s .fit and .predict.
You shouldn’t change the architecture, but recreate the model using the same arguments as during the initial training.
Loading the state_dict is used to load all previously stored (and trained) parameters and buffers into the model. It’s the first step when you want to fine tune the model (transfer learning).
That’s great to hear!
Once you’ve created a training, validation and testing loop, you might realize that there are not that many things to remember.
Some common issues are, if you forget to call optimizer.zero_grad() (which still happens to me after some time using PyTorch ), or to forget to call model.train()/.eval().
That being said, I’m not sure if there are any gotchas, but let us know, if you think I’m missing something.
It seems like the code is even easier as compared to training from scratch.
Some questions
My batch size is 64 and if I print every 5 steps.
With the following 4 steps below, does it mean I have already gone through 4x5steps = 20 batches? Or 20 x 64 = 1280 images?
Epoch 1/1..Train loss: 2.411.. Test loss: 0.593.. Test accuracy: 0.702
Epoch 1/1..Train loss: 1.049.. Test loss: 0.317.. Test accuracy: 0.873
Epoch 1/1..Train loss: 0.433.. Test loss: 0.191.. Test accuracy: 0.914
Epoch 1/1..Train loss: 0.302.. Test loss: 0.105.. Test accuracy: 0.963
I think I ran the full 1 epoch and the improvement is 1 or 2%. Do you usually suggest early stopping?
If I run this using fast.ai , will it will be significantly faster using the LR-finder ? Is there a similar one for PyTorch? I think Pytorch Lightning already released recently.
So usually how does one tweak the hyperparameter for transfer learning assuming I only obtain 75% instead of 96%?
Each iteration uses the specified batch size, so your calculation should be correct.
The accuracy improvement in the first iteration seems to come close to 26% in the first steps or are you referring to a later epoch? If you don’t see much improvement, I would suggest to stop the training.
This might be the case. FastAI uses a lot of utility functions and good practices to achieve really good results in less training time. I’m not sure which higher-level library has implemented the lr finder.
I would recommend to take a look at some FastAI lectures, as @jphoward explains a lot of techniques to properly fine tune a model. Also, you could use a Kaggle competition to try our some techniques and learn from others during the competition.
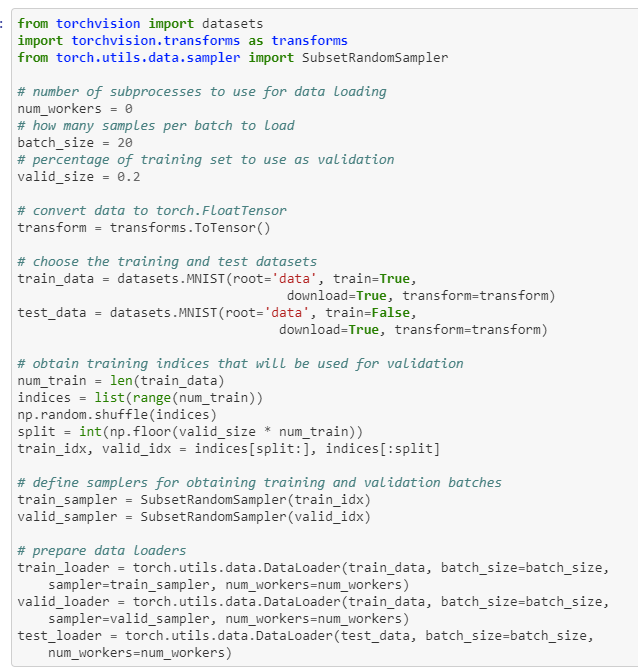
I’m just wondering if SubsetRandomSampler include stratify whereby % of classes are consistent in train and valid.
Last but not least, is this the usual way to split 80/20 between train and test(codewise) or is there a train-test-split( apologies as I’m looking from the sklearn angle)? Thanks
No, SubsetRandomSampler will just randomly shuffle the passed indices.
This would be a valid way, but I’m often using sklearn methods, in case I need to create stratified splits etc. If you are OK with adding sklearn as a dependency to your script, I would just use these methods.
so OpenCV is like an utility library to assist PyTorch in manipulating image?
I’m sure there is a few of such library. Will it be ok if I just still to one or is there a better library than OpenCV?
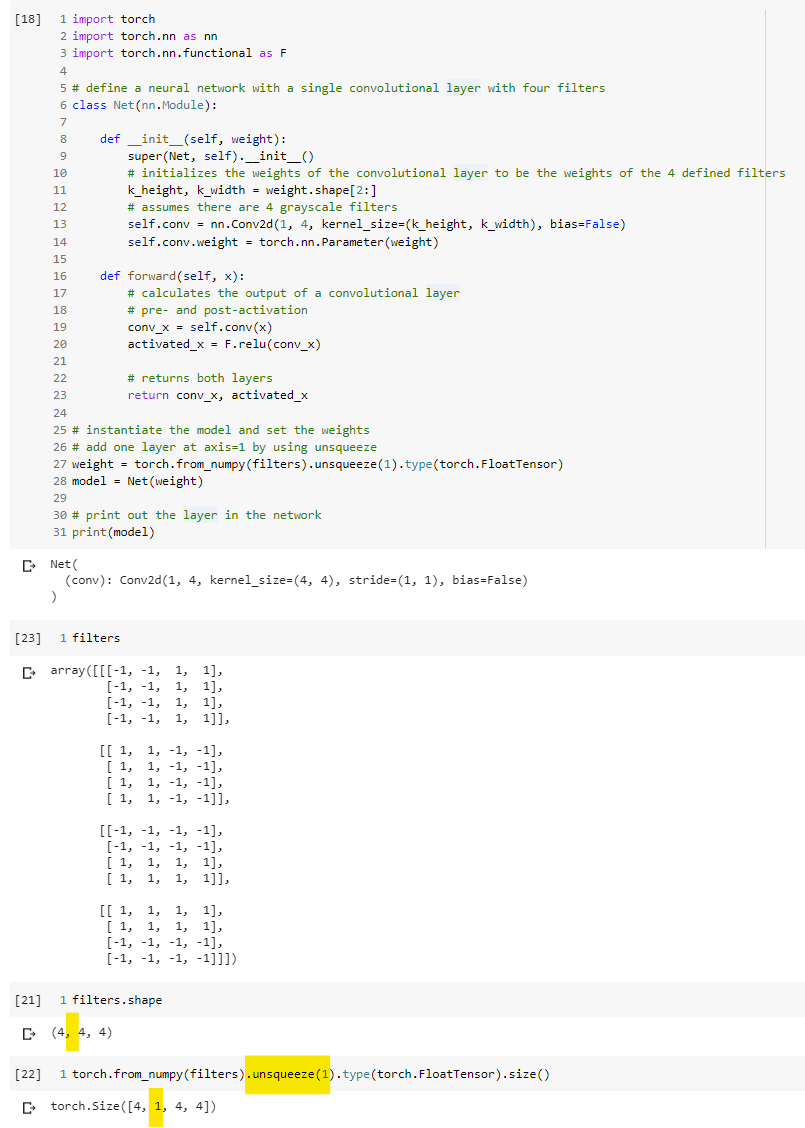
At the kernel level , when we apply a -ve to the pixel it will turn it to white(1) if it’s dark (255) and vice-versa ?
You can use every library you like during data loading and processing, as long as you don’t need to use this operation inside the model and need Autograd to calculate the backward pass through it. torchvision uses PIL as the default image library, but you can of course use OpenCV.
Note that the color format of OpenCV is BGR, while PIL and thus all pretrained models in torchvision use RGB, so you should transform the color channels if you want to feed these images to a pretrained model.
A -1 will invert the pixel values, so dark colors in a grayscale image should get bright and vice versa, yes.
So basically we’re doing an .unsqueeze(1) is because we wanted to match the shape. It’s grayscale hence we need to add the channel at axis =1 ?
BTW, I’m doing Udacity’s Pytorch course I think I’m now starting to feel uncomfortable when we reach CNN because there’s not much practice.
Also, usually when I code in Python, for things that I do not understand I can break it down piece by piece to debug and understand and for Pytorch I have ‘debugging skills’ issue. The codes are bundled and I can’t run step by step. Is there a tutorial on this?
It depends, what you want to do with this tensor.
If you want to pass it to a 2D CNN, then you would have to provide an input shape of [batch_size, channels, height, width]. Since the channel dimension might be missing, you would have to unsqueeze it.
Could you run the cells separately for debugging purposes?
I’m not familiar with the course, but where are you stuck?
I have not start coding yet, I will bring this up when start coding CNN. Thanks
CNN Question
#Input is 130 x 130 x RGB
nn.Conv2d(3, 10, 3) <- line 1
nn.MaxPool2d(4, 4) <- line 2
nn.Conv2d(10, 20, 5, padding=2) <- line 3
nn.MaxPool2d(2, 2) <- line 4
so basically at line 1 the input depth is 3 and the output is 10
and we use this formula
( input_depth + 2*pad - kernel )/ stride + 1
to determine the image size
example 130 - 3 / 1 + 1 = 128
From what I read the depth will be increasing ( from 3 to 20 ) and the image size will reduce ( divide by 4 and 2 )
Image will reduce due to MaxPool downscaling.
So when we see nn.MaxPool2d(4, 4) , the image will be divided by 4 . Is there a chance that the tuple of (4,4) will be a different value ?
So at line 2 will shrink by factor of 4 and at line 4 will shrink by a factor 2 .
Side tack
Also, if we want to maintain the image size with known kernel size and use padding to compensate we just use the following formula right?
( input_depth + 2*pad - kernel )/ stride + 1 = input_depth then re-arrange to find pad unknown
The output shape formula uses the input height and width, not the depth.
Also some minor errors are in the formula, i.e. the dilation is missing as well as some constant factors.
Have a look at the docs for the complete formula.
Yes, this conv uses 3 input channels and 10 filters, which create one output channel each.
Yes, that would be the case.
I don’t understand this question. You could pass non-square kernels, e.g. (4, 2), if you want.
when I was going through some of Andrew Ng’s video.
I think he is trying to teach us the intuition but I guess there are more parameters like dilation that I’m not exposed to.
I understood that (4,4) or (2,2) is reducing by a factor of 4 or 2 ?
Is it uncommon to use non square kernels?
So do we usually hand calculate these outputs or do we leave it for Pytorch to do so? Or do we need to understand some of these things under hood but let Pytorch to do the heavy lifting.
Yes, the spatial reduction would be 4x and 2x for these kernel shapes and strides.
It might be uncommon to use non-square kernels, but this doesn’t mean that you shouldn’t use them in your model, if you think they make sense for whatever reason.
You could calculate it manually, but for complicated use cases with an uncommon stride, dilation etc., I just print the output shape and adapt the parameters to match my desired output.
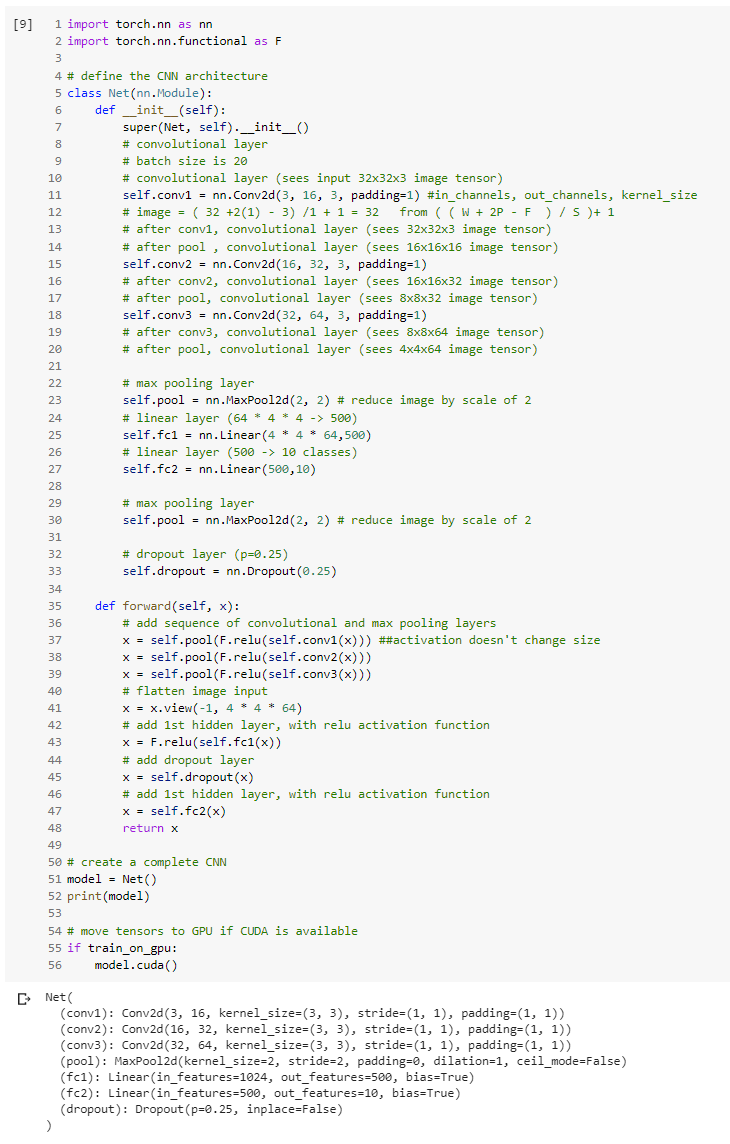
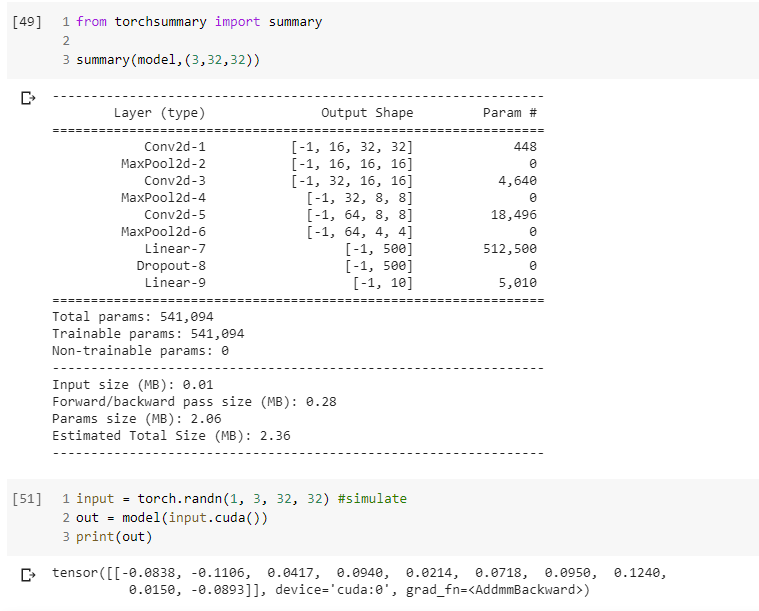
I manually calculated all the conv2d values
and also the FC1 and FC2 dimensions. Is there a way that it can be calculated by pytorch?
**Coincidentally, here with the use of padding 1, input equates to output before Pooling, hence
it’s slightly easier over here.
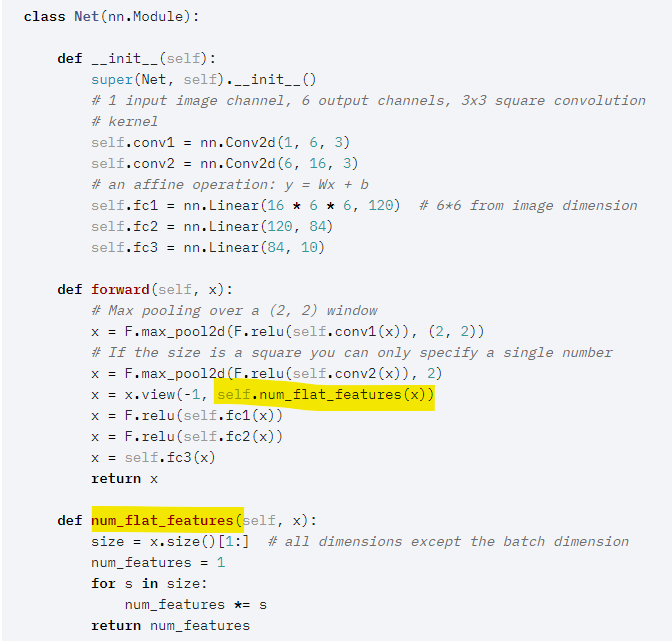
At line 41, is -1 referring to the batch size since we converted the rest to 4W * 4H * 64 final depth ?
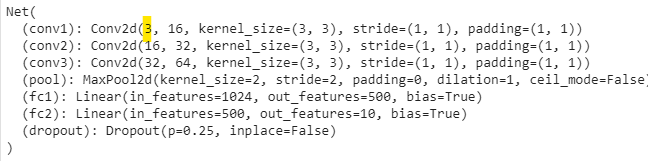
I understand that I did a resnet transfer learning before and it can achieve >90% but when I use CNN, I only managed to obtain ~70% based on this network. Conceptually would it be better to just use transfer learning instead OR this is just an ‘entry level’ CNN that will lead to a much better one that may or may not be better than transfer learning?
There might be utility functions in the wild, but I would recommend to use a dummy input tensor, print all necessary activation shapes, and set the input features of linear layers in this way.
Since each forward pass is dynamic in PyTorch and the computation graph will be created during the forward pass, the shape inference is not straightforward to calculate in eager mode.
Yes, the activation will be flattened to [batch_size, 4*4*64]. I would generally recommend to use x.view(x.size(0), -1) to keep the batch size and run into shape mismatch errors instead of changing the batch size, which would be harder to debug.
That might be expected, as a pretrained ResNet is quite powerful for a variety of tasks.
Also I realise that if my input is RGB the input/yellow needs to be 3 and if it’s grayscale it needs to be 1. Slowly trying to provide intuition.
I don’t quite understand how to do this. As mentioned, I think this is the portion that I’m kinda lost ( I do not know how to debug/go to manual mode ). Is there any tutorial that explain on this?
You would add print(x.shape) statements into the forward method to all places, where you don’t know the activation shape or don’t want to calculate it manually for the current input shape.
The num_flatten_features don’t avoid calculating the in_features as 16*6*6, but help you to flatten the tensor. I would still recommend to use x.view(x.size(0), -1).